English

Aqua Stone
Working methods
CimentArt
Essential tools for applications
- Protective tape
- Scissor or cutter
- Sander
- Sandpaper grit 40
- Sandpaper grit 120 – 150
- Spatula
- Steel trowel
- Microfiber roller
- Painting Pan
- Electric mixer
- Vacuum cleaner
- Measuring glass or digital scale
Necessary CimenArt products
- CimentArt Primer
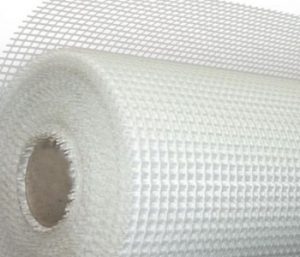
- CimentArt Fiberglass mesh
- Microcement AQUA STONE CimentArt
- Coloured Mixture Resin CimentArt
- Bi-component Polyurethane varnish CimentArt (Component A and B)
Before starting
Check the surface where the product would be apply and make sure the surface is:
- Straight
- Stable, motionless
- Dry and without humidity
- Clean
- Free of dust, grease, etc.
Step-by-step application
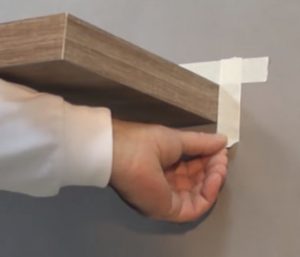
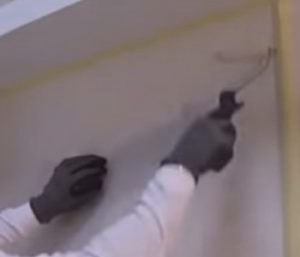
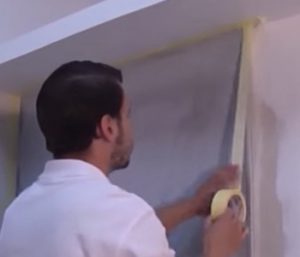
Place the protective tape where necessary
For the application over completely smooth walls, do only steps 2, 4, 5 and 6.
In the case of application on floors and walls in bad conditions or with tile joints do all the steps.
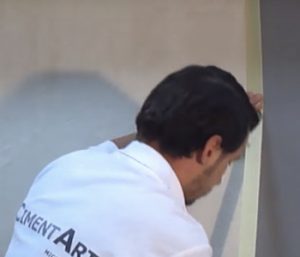
1. Extend the Fiberglass mesh CIMENTART over the Surface
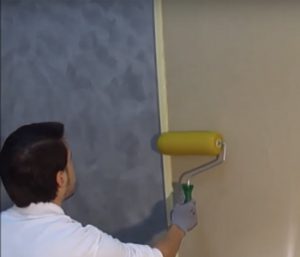
2. Apply a layer of CimentArt Primer with a roller over the fiberglass mesh, or in the case of completely smooth walls apply the layer over the Surface.
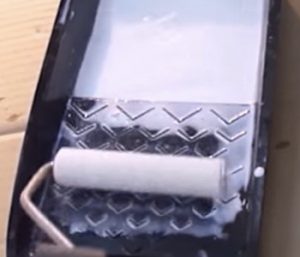

- Clean the roller and the painting pan with water
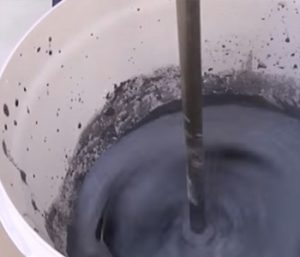
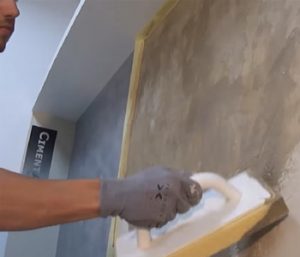
3. Regularization of the surface with AQUA STONE CimentArt
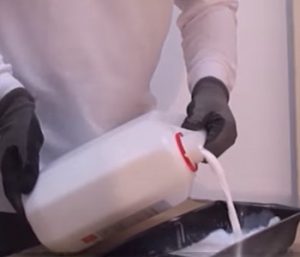
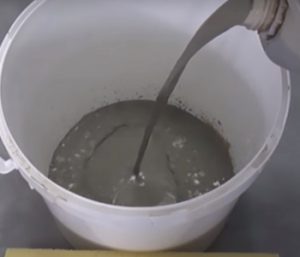
- The product is provided ready to be used; we recommend mixing the product using a spatula or electric mixer to obtain a complete homogenization of the paste
- The coverage is of 1 to 1,5 kg/m2 approx. to do the regularization procedure with a layer of 1 to 1,5 mm and only 1 layer been necessary. Therefore 1,5 kg of Microcement AQUA STONE per m2 would be necessary to regularize the surface
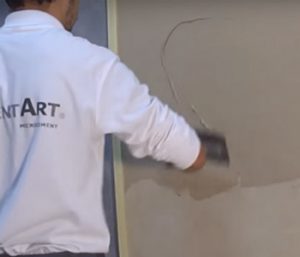
Application of the first layer of Microcement AQUA STONE:
- With the steel trowel, using an angle of 45° giving a thickness of 1mm maximun (the thickness is given by the grain of the mixture and by the pressure used during the application)
- Complete the first application making it as homogeneous and without irregularities as possible
- Tip: the first layer as well as the second can be spray with water and slightly pass the steel trowel to correct the irregularities
- Remove the protective tape before the Microcement AQUA STONE hardens
Allow the Microcement AQUA STONE to dry completely:
- The drying time depends on the humidity, temperature, ventilation, etc.
Place the protective tape where necessary
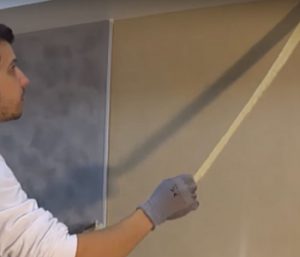
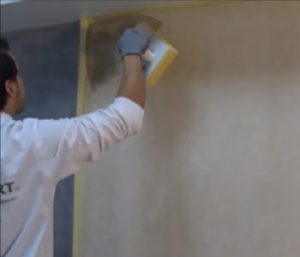
4. Application of the last layer of AQUA STONE CimentArt and the texturing process
- Apply the last layer of AQUA STONE, with a thickness of 1,2 a 1,5 mm maximum, on sections of 1 to 2 m2 maximum, with a steel trowel and automatically do the texturing

- The texturing must be done immediately after the application of Microcement AQUA STONE, before it starts to harden. For this, a textures roller CimentArt is necessary.

- Moist the texture roller CIMENTART with water and rolled from top to bottom (in the case of walls) or from front to back (in the case of floors), a distance of 25 to 30 cm maximum
This distance must be roll with the moist roller (if the texturing goes over 30 cm, this will make the roller stick to the Microcement AQUA STONE).
Moist again the texture roller with water and continue with another 25 to 30 cm and so on.
Once the texturing of the completed section is done, continue with the application of another layer of 1,2 to 1,5mm of Microcement AQUA STONE, (between 1mm2 to 2mm2) and continue with the texturing in the same fashion.
The application of Microcement AQUA STONE is always in the same fashion; application and texturing immediately, it can never be applied to whole walls or floors and then the texturing procedure it will not function.
While the paste of Microcement AQUA STONE is fresh with the texturing, we will get the natural rock effect. If the paste hardens, the texturing would be impossible.
The texturing is done without excerpting any kind of pressure.
Tip: For the joints not to be visible, the last layer of Microcement AQUA STONE is applied and texturized in a continuous fashion until the completion.
5. Color application (pigmentation) of microcement AQUA STONE CimentArt
- Place the protective tape where necessary
The pigmentation process of Microcement AQUA STONE starts once all the earlier process is completely dry.
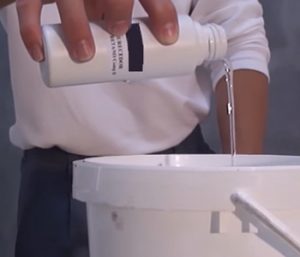
- Mix the Mixture Resin CimentArt, with the choose color, and pour into a bucket or a painting pan
- Moist a sponge with the Mixture Resin CimentArt and dye the surface with the chosen color, with short and circular movements
- Once this application is dry, the same procedure is repeated once or twice until we are satisfied with the finishing
Be aware that as many times the surface gets coloured with the sponge trowel, the Microcement AQUA STONE would be darker.
We recommend that, from the beginning the of pigmentation process, do an uneven and non-homogeneous application. Leave some parts with more color than others in order to create a better decorative effect.
6. Bi-Componente polyurethane varnish CimentArt
Bi-Componente varnish water base
Recommended for: Indoors and outdoors applications, in every wall, ceiling, floor of moderate traffic.
Preparation:
- Mix 5 parts of the Cimentart Base Aqua Varnish Polyurethane component A with 1 part of the component B
- To make 1 kg of varnish with the two components 840 gr of component A and 160 gr of component B are need it
- The approximate coverage is of 50 gr/ 1m2, applying a thin layer of 0,1mm. Is always necessary to apply two layers. To complete a surface of 10 m2 with two layers approximately 1 kg of the mixture is necessary
Varnish HARD Polyurethane bi-component CimentArt Solvent base
Recommended for: indoors and outdoors applications on floors of intense traffic.
Preparation:
- Mix 2 parts of the Component A of the Polyurethane Varnish HARD CIMENTART Solvent Base with 1 part of component B.
- To make 1 kg of Vanish HARD with the two components 666 gr of component A and 333 gr of component B are necessary
- The approximate coverage is of 100 gr/1m2, applying a thin layer of 0, 1 mm. it is always necessary to apply 2 layers. To complete a surface of 10 m2 with one layer 1kg of the mixture is necessary

- Using a microfiber roller or a spray apply a first layer of varnish, 0,1mm of thickness (tipping off the surface when using the roller) and let dry at least 12 hrs
- Using microfiber roller or a spray apply the second layer in the same fashion of the first one
- A third layer can be apply for more protection, mainly on those areas exposed to water like showers or outdoor terraces
- Do not forget to clean the roller and the painting pan with water or a solvent, depending of the varnish used
Important
- Microconcrete AQUA can be use on any Surface with the exception of those surfaces that have capillary humidity, pools, basements and factories with heavy machines traffic
- Never use Microcement Base Aqua with layers over 1mm of thickness
- Never use Microconcrete Aqua with layers over 0.5 mm of thickness
- On places of high people traffic, like shops, offices, malls, etc., we recommend to apply a third layer of Varnish HARD polyurethane bi-component
- Use the Varnish of Polyurethane CIMENTART always with thin layers of 0,1mm.
- Make sure all the Microcement surface is cover with the Polyurethane Varnish
- The traditional Microcement CIMENTART can be use without any problems on showers and areas constantly exposed to water. However, for this type of surfaces the use of gama AQUA, ready to use and 100% waterproof on all its layers is recommended
For any technical guidance write to: contacto@grupocimentart.com